
Table of Contents
Brief Introduction
Git is an open-source version control system which is very popular in the community. GitHub on the other end is like the online version of Git. Now they both are similar, just that Git is more ‘command-line type’ and installs locally on your PC, and GitHub has a GUI or Graphic User Interface and it’s basically online.
The basic idea is to write the code for a project, save it in Git repository (locally) and finally push the code to GitHub.
It acts like a dairy of events for projects wherein you can see all the changes made to your projects. It keeps an account of your day-to-day activities regarding your projects and its implementation.
In GitHub anyone like your friends or your organisation can see, edit and contribute to your projects and vice-versa if you allow each other to do that.
How to Install Git for the first time
As a first time user, initially, you’ll need to update your Linux system. To update your system using terminal commands, open up your terminal (Ctrl + Alt + T) and run these commands :
sudo apt update
sudo apt upgrade
If your OS is already up-to-date, it will show a message, or else the above commands will update your OS which might take some time.
Now that your Linux OS is updated, we will install Git. Note that Git might already be installed on your system but we’ll anyways install the most updated version here by running the following commands in the terminal :
sudo add-apt-repository ppa:git-core/ppa
sudo apt update
sudo apt install git
Now, let’s check whether Git has properly been installed by verifying the version. To verify the version, run the below command :
git --versionYou will get a message like ‘git version 2.39.1’ which means that Git is properly installed on your local computer.
See the official documentation for the terminal commands here.
Create an account on GitHub
In the next step, you need to create an account on GitHub. It’s like creating an email ID. So create your GitHub account using an email ID. It’s pretty straightforward.
How to Set Up and Configure Git
To set up and configure Git, use the below terminal commands:
git config --global user.name "your name"
git config --global user.email "your email address"
Use your own genuine credentials – name and email ID inside the quotes, the same as in GitHub. In case you’re using a private GitHub email ID, use that in second line above.
To make the user interface a bit colourful to work with, use the following command(optional) :
git config --global color.ui autoGitHub’s default branch where new repositories were stored up until some time back was ‘master‘ and now they have changed it to ‘main‘. So, if you’ve already created your GitHub account earlier then you can change the default branch for Git using the below command (I recommend doing this) :
git config --global init.defaultBranch mainNow verify that all things are set up and configured properly by typing these commands :
git config --get user.name
git config --get user.email
Your name and email ID should display now, it means that everything is up and running.
Creating an SSH Key
In this step we will create an SSH Key which is used by GitHub to identify your PC. What it does is that it gives your PC an access to GitHub repositories without typing in a user ID and password each time.
Firstly you need to check whether an Ed25519 algorithm SSH key is already installed on your system. Now what is this ‘Ed25519 algorithm SSH key’ ? Well, it’s a connectivity tool for remote log in with SSH protocol, and it’s apparently secure . Now, to check its availability, use this command :
ls ~/.ssh/id_ed25519.pubIf its available, good! If not, then this message appears – ‘No such file or directory’ and you need to create the SSH key yourself.
So, to create the SSH key, type the following in the terminal (the last part is your email ID) :
ssh-keygen -t ed25519 -C my_Imaginary_ID@mail.comWhen prompted for a location, just hit enter to proceed with the default location. Next, when asked for password, give a password if you wish or just hit enter (most people just hit Enter).
Linking the SSH Key with your GitHub profile
You have now created your new SSH key. In the next step, your GitHub account needs to recognise your SSH key so that you can push your code to your repositories without using any user name and password every single time.
Go to GitHub>>Settings>>SSH and GPG keys. Now click the New SSH key button. In the title section, give it a name (e.g. My Linux Connection). Please leave this window open for now (as there’s something else to do later).
Meanwhile in the terminal type this and press enter :
cat ~/.ssh/id_ed25519.pubNow copy the whole output starting with ssh and ending with your email ID and paste it in the ‘key’ field box of your GitHub window (which is already open). Click Add SSH key button.
You’ve now linked your new SSH key with your GitHub account. You can do the same to link multiple PCs/laptops.
Test your SSH connection
You can now test your connection as to whether it’s working properly or not.
Open the terminal and enter the following:
ssh -T git@github.comNow you should get this message – ‘Hi USERNAME! You’ve successfully authenticated, but GitHub does not provide shell access.’ (Click here for the resource to understand this thing further)
It means you have successfully linked your SSH key with your GitHub account. The mission is now accomplished! You’ll now be able to push your code to GitHub using the terminal commands and Git!
Note – This process also works on a Windows PC if you’re using the Windows PowerShell App and not Command Prompt.
Create a repository and push codes to GitHub
Now that everything’s set and done, go back again to your GitHub account and create a new repository.
Creating a new repository is also very straightforward, just login to your GitHub account and click on the ‘+‘ icon or the ‘New‘ button and create a new repository. Name the repository my_first_project, give it a description and hit Create repository button.
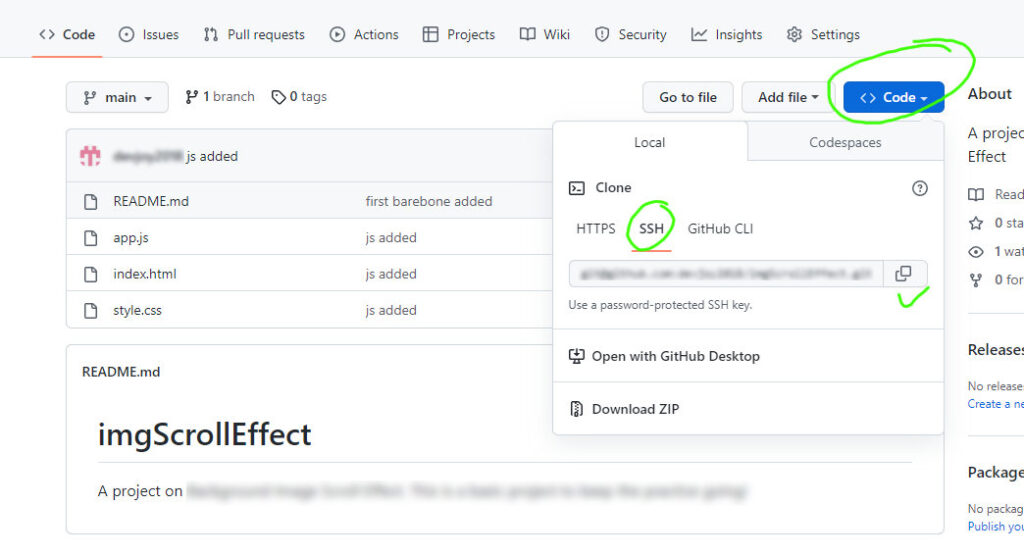
After that you enter the repository and click on the code button. Copy the SSH key as shown below :
Next use the following terminal commands :
git clone <paste your SSH code here>
# paste the code without the '<' and '>'
The above code will copy the repository into your local PC.
After you’ve copied the repository on your local machine you’ll then need to cd into the my_first_project folder using terminal and then the following commands :
git remote -v
# 1- this will show a 'fetch' and 'push' link which means that the repository has been properly copied to your system

code .
# 2- assuming you've already installed vsCode, this will open your repository in the code editor. In this step you can do your coding.

git add .
# 3- this saves the changes made to your local Git repository.

git commit -m "add a comment here"
# 4- commits the changes before pushing code to GitHub

git push  OR  git push origin main
# to push the code to GitHub

git status
# shows the current status of whatever you're doing now
These are some of the basic steps which you can follow in order to get started for the first time with Git and GitHub.
However, there are other ways to get started like using GitHub Desktop, or uploading your codes and projects manually which eventually saves you the pain, but professional developers and companies by and large generally go the command line way.